
 Happy Leap Year!
What better day to share my first project with you. As mentioned in my first blog post I am a college student working towards my acceptance into PA school. Now, if you have any idea of what college is like, you probably know how small the dorm rooms are (I mean tiny)–imagine what it would be like to live in a white, cinder-block refrigerator box. I was blessed with my own room, but that doesn’t necessarily mean it was any bigger than your average dorm room. Although some might say this is cozy and it’s all part of college, who says you can’t have a little fun with the layout and design? When I unlocked the door on the very first day I was almost blinded by the blank space (or lack of space) surrounding me. IT WAS NOT GOING TO WORK. So I got a little creative 🙂
With limited resources at my fingertips, I had to do a quick survey of everything I brought with and decide what would be absolutely necessary for me to purchase to give the room a finishing touch. Luckily, I packed last minute (meaning I over-packed) and had more items to work with than I originally thought.
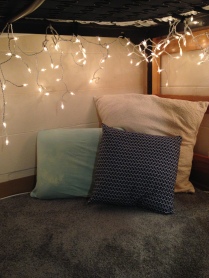
To begin, I raised up the bed (not all the way, but
enough to create usable floor space). Then I spread out a soft gray rug I found at Target for under $20 to warm up the space, I added white twinkle lights (to create the perfect study lighting while also brightening up the space), and then I added the final touch–pillows. Over summer one of my projects was to figure out how to make throw pillow covers using inexpensive fabric from the store. I ended up with 4 different covers, and two pillows to use in my decorating. I created the perfect study space and reading nook that was warm and cozy while also utilizing the otherwise unused space underneath the bed.
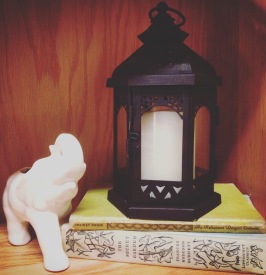
Once my study nook was finished, I started unpacking my desk items. Once my books were in their place and my pens were in their holder I had a little fun creating focal points on my bookshelf that represented who I was. Anybody who walks into my room instantly knows I am an elephant lover because many of my spaces features a unique elephant feature.The photo to the right shows an elephant planter from my grandma (which now houses a beautiful Jade plant), grouped with two antique books from a local thrift store, and my favorite bohemian lantern. The candle in the lantern is on a timer and it flickers every evening setting the
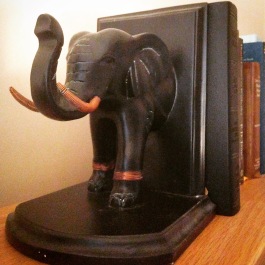
perfect mood for some late night reading. On the very top of this bookshelf is one of my favorite summer rummage sale finds,which had to be front and center. This summer I started collecting more bohemian pieces and the one item I wanted more than anything else was elephant book ends. The last weekend before school my mom and I took a new route to my grandma’s for whatever reason, and there on a corner was a tiny garage sale with less than 15 items for sale–of course there were the coolest elephant book-ends ever and I scored them for $4 (another reason I love thrifting).
Once my desk and bookshelf were completed, the next order of business (the fun part), was to make the bed and decorate the surrounding walls. I used the same grey comforter from the previous year (also a Target find) and placed the rest of my pillows on top. For the walls…On the wall next to my bed I taped a huge bohemian tapestry (PSA: 3M tape works amazing for hanging tapestries). Then I bought a simple world map and hung it above my bed and used some dollar store frames of different, but complimentary designs to hang a few pictures around the map. Next to my bed I put the filing cabinet I re-purposed (blog post coming soon) as a nightstand. On that went my simple silver and white lamp, my metal “A”, and of course a small elephant statue.
Throughout the school year I have altered a few things and have added a few new rummage sale finds to my collection, but overall my original design still stands. The image below is the finished product, although a few of the wall decorations mentioned are not present here. This is the first room I was really able to decorate myself and it has brought me great joy and comfort thus far. Can’t wait to design more spaces in the future! 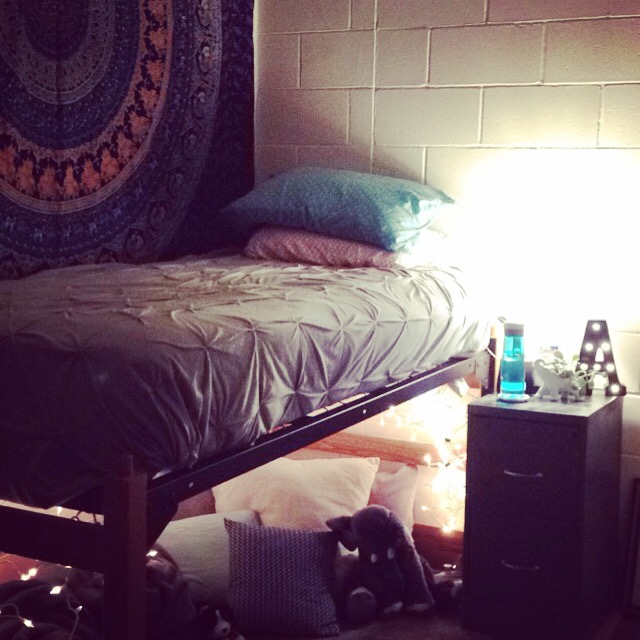
If you have any questions for me please feel free to leave a comment and I will answer as soon as I can. If you have any ideas for me or my business or would like to share a picture of a space you need staged or have staged yourself, please feel welcome to do so 🙂
Don’t forget to subscribe to this blog and follow me on twitter (@StageYourSpace) to read my latest blogs and follow my journey.

The room looks great now and has its own atmosphere and coziness!
LikeLiked by 1 person
Thank You! 🙂
LikeLiked by 1 person